Introduction
![]()
Cross-platform open source photo booth software. Capture your events in an easy and fun way!
Jump directly to installation steps
Jump directly to getting started guide
Features
- Capture images and collages
- Single capture
- Multi-capture
- Fixed layout – 2, 3, or 4 photos
- User chosen layout – shoot 4 photos and then select the ones you like to for a collage of 1, 2, 3, or 4 photos
- Manual collage creation – process pictures after untethered handheld shooting
- User friendly, touch-centered interface
- Beautiful animations
- Multi-language support
- Different UI themes available
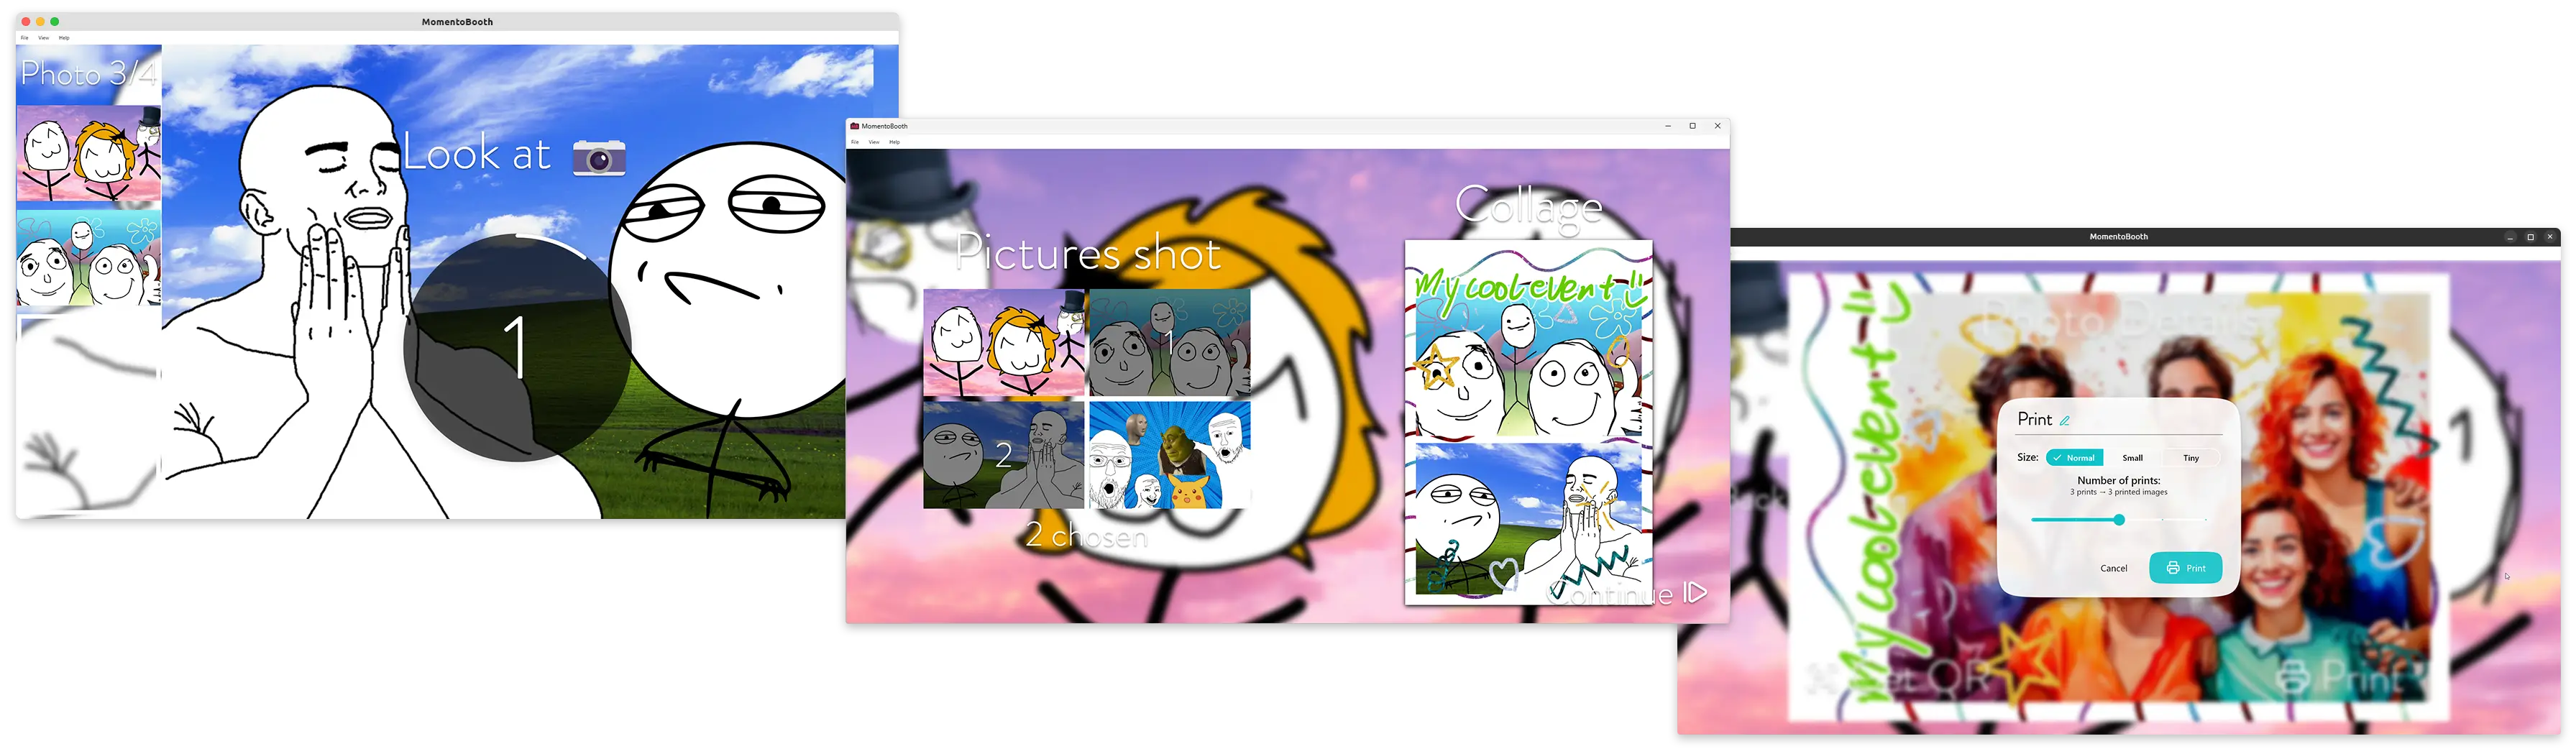
- Photo printing
- Lots of settings included to size and position your print well
- Support for native printing method and dispatch to CUPS server
- Photo sharing using QR code with
ffsend - Theming with collage template images (background and foreground)
- Rich live view and capture options
- Select device with 1 click or select custom options & combinations
- Webcam
- You can use HDMI capture dongles that act as a webcam
- Digital camera
- Use any camera over USB that supports live view through libgphoto2, capture also required for high quality captures
- With Sony Imaging Edge Remote using AutoIt
- Quick debug options for when no hardware is available
- Gallery with created images
- Easily re-print or -share
- (beta) Analyse images and
- Order by # of people on picture
- Find your image with face recognition
- Keeps (local) use statistics – how many photos were taken, prints were made, …
- Easy administration
- Clear settings panel
- Keep organised with project directories
- Health checks of external IPs/HTTP services with clear warning banners
- Cross platform
- Supported on Windows, Linux, and macOS
- Low system requirements
- Can run comfortably, even on old hardware
- Integrates with Home Assistant
- State communicated over MQTT
- Easy automation – e.g. WLED lights that respond to countdown and capture
Planned
- Improve distribution options
- Linux Flatpak distribution (x86_64 and arm64)
- Windows arm64 distribution
- Up to date macOS builds (with correct signing)
- Maturing
- Provide choices in exception sharing
- List licenses of libraries
- Translate
- … to more languages
- … more parts of the app
- Test
- More cameras – get in touch!
- New features
- Backend/control API
- Physical button control options
- Voice/LLM control
- Remote monitoring
- Deep learning based background removal
- Video capture support
- Offer more control over collage layouts
- Allow generating reports for easier support
- More sharing options
- Backend/control API
Development
For development setup instructions, see the dev documentation.
Translations
MomentoBooth uses the awesome Weblate to manage translations. If you would like to add a new language or improve existing translations, please use Weblate to make suggestions — Weblate will automatically create a PR for you!
Currently supported languages are
| Language | State |
|---|---|
| 🇬🇧 English | ✅ Base language |
| 🇳🇱 Dutch | ✅ Fully checked |
| 🇫🇷 French | Mostly checked |
| 🇩🇪 German | ⚠️ Unchecked |
Links
The concept
This page will briefly explain the concept and user experience of MomentoBooth.
First of all, the central ideology behind MomentoBooth is to create a fun experience for everyone involved with the software. This philosophy shows itself in little things like the confetti that shows when a capture is completed, but also the control that organisers and users have over their own experience.
The interface is meant to be used with a touchscreen, though other ways of controlling the software are being considered. As any photobooth software, the main mechanic is to capture photos at the end of a countdown, present users with some themed version of that picture. Optionally this picture can be printed or downloaded.
MomentoBooth has two main capture modes: single capture and multi-capture.
Single capture
In single capture mode, the software only takes a single photo and presents the user with the result. Whether this is just the picture or a collage with 1 picture depends on the user’s project settings. The user can choose to retake a picture if the result is deemed unflattering. The system will ask whether they want to keep the old file or not.
Multi-capture
In multi-capture mode, multiple pictures are taken that are subsequently merged in a collage image. There are two ways to go about this: have a fixed number of images for a fixed layout, or offer the users a choice after shooting images.
Different layouts
MomentoBooth currently supports 4 different collage layouts, containing and corresponding to 1, 2, 3, or 4 pictures. The layouts are structured like this:
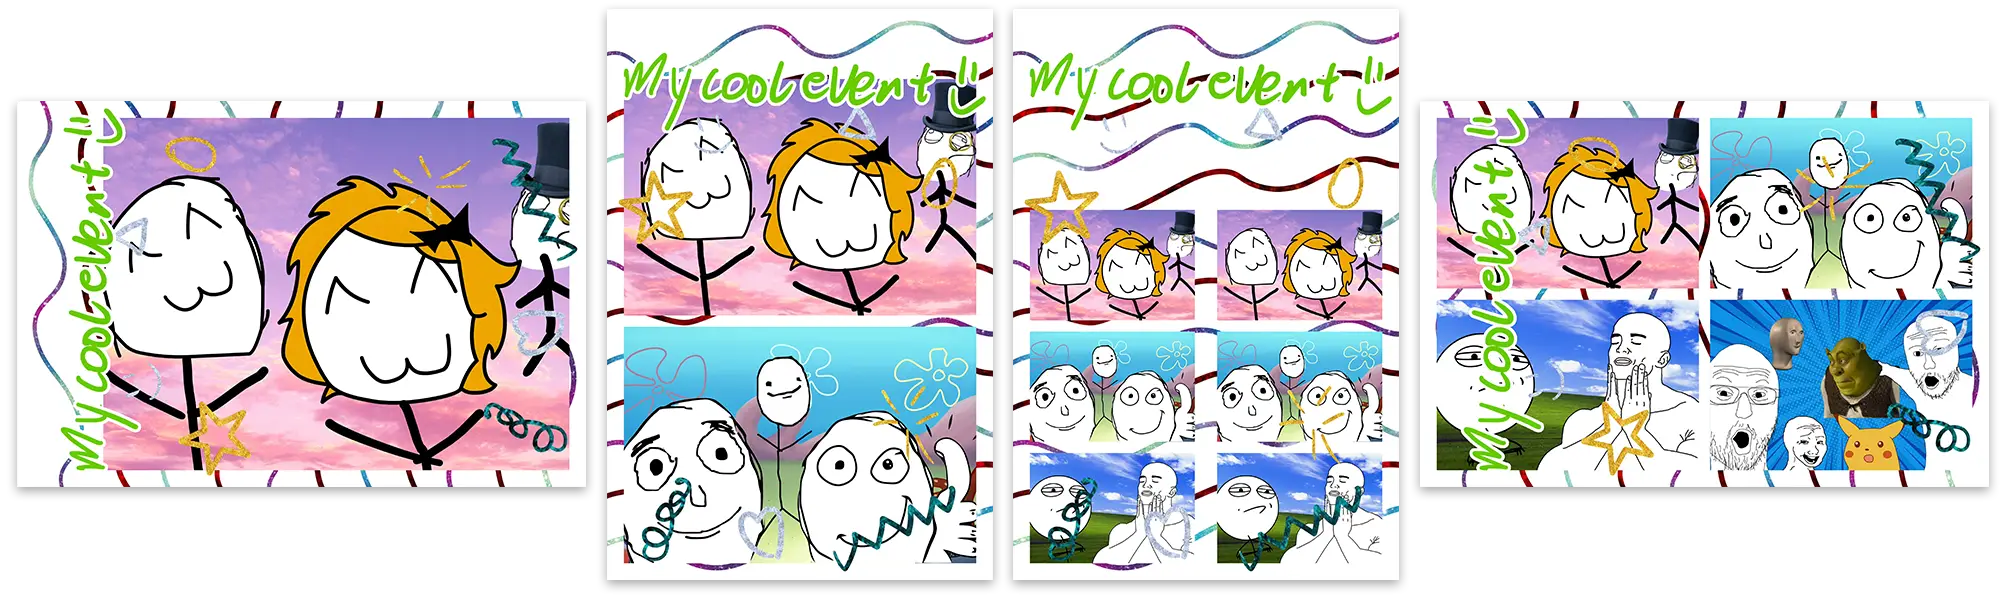
- Collage is landscape; the picture also in landscape position with some margin for theme material.
- Collage is portrait; the two pictures positioned above each other.
- Collage is portrait; the layout with 3 pictures is the one classically used by other photobooth softwares, and will be printed as two strips in one print. These can be cut automatically by supported printers.
- Collage is landscape; the 4 pictures are arranged in a grid.
Note
Here, all the layouts use the same template files, but they can be customized per layout.
In the future, we want to offer more customizability in the image placement layout.
Fixed number of captures
This is the classical modus operandi of photobooths. You hit start, the machine takes a number of pictures, and it presents the result. The organiser of the event can choose which version of the layouts they want, limiting the number of pictures taken to the number of images in the layout.
A slight difference with the classic photobooths is that MomentoBooth allows you to choose exactly how many prints you want, and one can optionally also choose the print size.
User collage choice
In the “user chooses” mode, 4 pictures are taken. Then, the users are presented with a collage creation screen where they can choose which pictures they want to include in their collage, and in which order. They can thus opt for a result that contains 1, 2, 3, or all 4 photos that were taking, resulting in the different layouts described above.
After finishing the selection process the users can optionally print or download their collage on the share screen.
Advanced: manual collage mode
This mode is not accessible from the normal usage flow, but can be entered from the menu or by pressing Ctrl+M. In the manual collage mode, the user (probably the moderator) is presented with a list of all captured input images, and can create new collages from this material at will. This allows, for example, the creation of multiple collages of the same 4 captures, or the creation of collages of manually shot pictures of the event.
Now, let’s move on to the getting started page to start capturing!
Installation
MomentoBooth is cross platform and supports Windows, Linux, and macOS. The installation steps differ per platform. Windows is as of yet the easiest.
Note
Just acquiring and executing the software is enough to use webcams, but digital cameras need additional driver configuration.
Windows
On Windows, there a few methods are available to acquire the software.
Important
In all cases, the Visual C++ Redistributable runtime libraries need to be installed for MomentoBooth to work on Windows.
Download from GitHub
When you go to the releases page on GitHub, a few assets are available per release.
Windows installer application
When you download the MomentoBooth-X.XX.X-XXX-Win-x64-Setup.exe file from the assets, you can execute it to install MomentoBooth as a system program. A start menu item will be created.
zip archive with portable application files inside
Just extract the files anywhere you want and run the photobooth.exe executable.
Using h3xup
The h3xup tool can be used to easily update and switch between different releases of MomentoBooth. Make sure that the h3xup command is available in the PATH and run the following command in the directory that you want the program files to reside in.
h3xup switch --s3-url https://nbg1.your-objectstorage.com/momentobooth-app --filestore-path-prefix Photobooth-Win-x64 release
Whenever a new release is available, just run
h3xup update
Set up development environment
This is not recommended if you just want to try out the software. However, if you want to make edits to the software or test in-development features, you can set up a development environment.
Linux
For Linux, an appimage is available on the releases page on GitHub. Though you should be able to download this file and run it directly (making sure the file is executable with chmod), there seems to be an issue where the appimage does not work unless a flutter run has been done in a development environment. Fixing this issue, and a Flatpak application image for easier updates and possible space saving, are on the to-do list, but not available yet.
You can also choose to set up the development environment.
macOS
For macOS, an automatic build pipeline is available for the application, but currently not in use. This is due to the fact that Apple requires all applications to be signed, and to do this an active Apple developers account is required, which costs $99 per year at the time of writing. Since we make no money with this software, doing this is not (yet) worth it. Therefore, right now unfortunately your only option is to set up the development environment and build it locally. We are looking into other options, however.
Getting started
Getting started with MomentoBooth is easy! You only need a computer/laptop with a webcam for a minimal setup. This pages lists our hardware recommendations and minimal software set up steps.
Minimal hardware
THe minimal setup mentioned above approximately consists of a computer that is not ancient with a webcam. You can check out specific details in the fly-out below.
A very basic (but useful for experimenting and developing) setup
- A computer
- OS either:
- Windows 10/11
- Windows 7/8/8.1 might work, but untested
- Linux
- Ubuntu 20.04 or newer, other recent distros should also be fine
- macOS
- Only tested on macOS 13 (Ventura), older versions might work but untested
- Windows 10/11
- CPU: Intel Core i5 (2nd gen) or equivalent
- Older might work, but untested
- GPU: Integrated or dedicated graphics by Intel/AMD/NVIDIA
- Anything > 2010 should work fine, a little older may also work
- Software rendering might work but untested
- Memory: 4 GB
- Disk: HDD with at least some space left for photo storage
- Monitor: Anything
- OS either:
- Webcam (optional)
graph LR
    C{Computer} -- "USB (or Integrated)" --> W(Webcam)
Recommended hardware
If you want to provide the full experience to the people at your event, a decent computer with touch screen, digital camera, and maybe even a printer are required. See the fly-out below for our recommendations.
Recommended setup
- A computer
- OS either:
- Windows 10/11
- Linux
- Ubuntu 20.04 or newer, other recent distros should also be fine
- macOS 13
- CPU: Intel Core i3 (6th gen) or equivalent
- GPU: Integrated or dedicated graphics by Intel/AMD/NVIDIA
- Memory: 8 GB
- Disk: SSD with enough space left for photo storage
- Monitor: At least 1920×1080 px with touch
- OS either:
- Digital camera
- Live view: Supported directly by gPhoto2, or using HDMI out and a USB HDMI capture device (which can act like a webcam)
- Capturing: Supported directly by gPhoto2
- Optional: Photo printer
- Optional: Internet connection
graph LR
    C{Computer} -- USB --> A(Camera)
    H["HDMI capture device (optional)"] -- USB --> C{Computer}
    A -- HDMI --> H
    M -- "USB (touchscreen)" --> C
    C{Computer} -- VGA/DVI/HDMI/DP --> M(Monitor)
    C{Computer} -- "USB/(W)LAN" --> P(Photo printer)
Running the application
Getting up and running is quite simple, and the process looks mostly like this:
graph LR
    I(Install MomentoBooth) --> IS(Select image source <br> e.g. webcam) --> O(Open project folder) --> T(Place template image file) --> C(Start capturing)
Below is a step by step explanation of what to do.
- Download/install the latest MomentoBooth release for your OS, check the install instructions.
- It may be convenient to place a shortcut on your desktop.
- Run MomentoBooth.
- You will be greeted by the onboarding wizard to run some checks and get some things set up.
- In the imaging device page, you can select which webcam or camera you want to use. Optionally you can use one of the debug options for testing if you do not have appropriate hardware available.
- If you have a file with setting presets to use, drop the file or text in the box on the respective page of the onboarding wizard and press accept.
- During the wizard you will be prompted to open your first project folder. This folder is used to look for templates and store the captures, output images/collages. We will come back to it later.
Tip
Optionally, you can change your imaging in the settings panel.
- Use the menubar or press
Ctrl+Sto open the settings panel. → See all shortcuts. - Go to the hardware tab
- Scroll down to Live view and capture and select your device from the list.
- If you do not have a webcam available you can also select e.g. “Static image” as a live view source for testing.
- Press
Ctrl+Sagain or click outside the settings to exit the settings screen.
- Once you complete the wizard, you will see the start screen, with the text “Touch to start” and the image from the webcam/camera/test method on the background.
- Go to your project directory (using your file explorer or by using the menubar), go to the
Templatessubdirectory, and place a background image (in portrait orientation) calledback-template.jpgorback-template.png. See template setup - You are now ready to shoot your first pictures!
Once you have the basics up and running you can try connecting a camera, adding a printer, or designing a beautiful template for your next event.
Current limitations
Warning
While the application has been used and tested at different kinds of events, this is open source software made by people in their free time. Please read the list of limitations.
- Webcam support may not be working in some cases (depending on OS and frame format used by the webcam).
- As of 2024 Q3 there is are some bugs in the library that is used for this functionality, these will be resolved in future versions.
- Due to this bug, HDMI capture also might not work. As such camera’s which don’t support live view over USB through gPhoto2 but do support live view using HDMI out (e.g. Nikon D3100) current might not work.
- Workaround: Use a camera which supports live view using USB, or try another OS.
- Live view through gPhoto2: Currently only Nikon D3400 and Sony α6400 have been tested.
- As many Nikon cameras use the same commands for activating and deactivating live view, other Nikon DSLR models which support live view over USB may work.
- Many mirrorless (non-DSLR) cameras may work fine anyway due to live view mode being activated automatically (e.g. Sony α6400).
- The camera handling code is written with future special cases for different brands and models in mind, however we do not have any devices available for development and testing currently.
- Workaround: Try the different options available in the settings screen. If these don’t work, your help might needed to fix the issue if possible at all. Please let us know by raising an issue on GitHub. Be sure to first check whether your model is listed on the gPhoto2 compatibility list. We might be able to expand the compatibility of the application with some remote testing. No guarantees however.
- Linux AppImage might not work due to packaging issues
- Workaround: Run the application on Linux using
flutter run --release. This should work on both x86_64 and arm64.
- Workaround: Run the application on Linux using
Peripherals
Check out the pages listed under this page in the side bar for information about hardware peripherals such as cameras and printers.
Hardware compatibility
Warning
Make sure to use good quality USB and HDMI cables and preferably connect any USB devices without extension cords. There have been reports of freezes in camera handling due to bad cables. Try different USB ports and/or hubs if any problems arise. Also make sure to power your devices properly for long time usage.
Tested cameras
MomentoBooth utilizes the great gPhoto2 library for communicating with supported digital cameras. Due to this MomentoBooth should support a broad range of cameras from a broad range of vendors.
These are the ones that we have tested ourselves or have received a report about. If you have tested a camera which is not on this list, please report on GitHub and we will happily update can update this list.
| Brand | Model | Live view | Capture | Remarks |
|---|---|---|---|---|
| Nikon | D34001 | ✅ | ✅ | Live view stops after 30 minutes, still needs an automatic workaround (manual workaround: press Ctrl/Cmd+R) |
| Sony | Alpha 64002 | ✅ | ✅ | Also known as ILCE-6400 |
Tested printers
MomentoBooth uses the printing library for Flutter to print to any printer(s) installed on your computer and as such should offer the same compatibility as applications like your Office suite and web browser.
If you have any printers to add or any special remarks about your printer, please let us know using a GitHub issue.
| Brand | Model | Works | Remarks |
|---|---|---|---|
| Canon | SELPHY CP1300 | ✅ | Works using USB (recommended) as well as WiFi; look here for sample settings |
| Canon | SELPHY CP1500 | ✅ | Works using WiFi, not at all using USB (at least on Windows); look here for sample settings |
| Kodak | 6850 | ✅ | Only has USB; works both with native and CUPS printing; look here for sample settings |
-
Set Use Special Handling to ‘Nikon DSLR’ ↩
-
Set Use Special Handling to ‘None’ ↩
Camera
Camera usage within MomentoBooth constists of two parts:
- Live view
- Photo capture
For both aspects a few options are available. In general you either work with a webcam, or a separate camera.
Webcam
This is the easiest option to set up. Connect a supported webcam, and use it for both live view and photo capture. This method does not usually result in great image quality, but is great for testing.
Camera
For using a external camera, two methods are available at the moment.
- Using the
gphoto2implementation - Using a vendor remote tethering program (Windows only)
gphoto2
Camera support overview – Needs at least capture support and liveview.
Alternatively, see the libgphoto2 supported cameras – Needs at least Image Capture and Liveview.
Using the gphoto2 implementation is very convenient, as it allows for both live view and high quality photo capture through a single USB connection. Check the above link for which cameras are supported.
Vendor tethering
When a camera is not suported by gphoto2, it may be an option to use a vendor tethering program for photo capture through an AutoIt script. This works as long as the vendor program writes JPG images to a specified directory.
Live view must then be obtained from a camera feed.
- This can either be with a video capture device (usually HDMI) You need the capture device and camera video out cable.
- or by capturing the tethering software with OBS Studio and working with the OSB virtual webcam output.
The right webcam source can then be selected in the live view settings.
To activate the AutoIt script, select Sony Imaging Edge Remote as capture source and set the image input directory.
Physical camera set-up
When running a photo booth at an event, the camera will likely need to be turned on for several hours. A normal battery will not be able to supply energy for that long. It is therefore recommended to get a dc dummy battery, which is connected to an external power supply. The most convenient solution is one that works with USB C Power Delivery, as it can be connected to any PD power supply and so does not require a specific adapter. These usually run between €15~€30.
It is also recommended to mount your camera firmly on either a big or a small tripod so it is stable and can be aimed in the right direction.
Printer
Printing your photos and having a physical reminder of an awesome event is one of the most fun parts of having a photo booth. Therefore MomentoBooth has well-configurable printer support! For an overview of the available settings to tune printing, see the printer hardware settings and template settings.
Getting the print settings right requires quite a bit of trial and error. Ideally a print shows the full collage without parts being cut-off or white borders. For this purpose you probably want to use borderless printing.
Print system
MomentoBooth supports two methods of printing. “Native” printing using the printing package, and printing to a CUPS server. The choice between these systems will depend on your set-up.
Recommended settings for Canon Selphy CP1300/CP1500
The Canon Selphy series of cheap and compact photo printers. The Selphy printers are quite convenient for photo booth purposes, as long as the volume of prints is not too big, since they have a limited and ink roll paper storage volume.
Here are settings that are known to be approximately right for using this type of printer (using native printing method).
| Property | Value |
|---|---|
| Collage aspect ratio | 1.48 |
| Collage padding | 10 |
| Page height | 148 |
| Page width | 100 |
| Printer margin top | 0.0 |
| Printer margin right | 1.6 |
| Printer margin bottom | 0.5 |
| Printer margin left | 1.6 |
| Use printer settings | On |
Make sure to set the default settings of the printer to portrait mode, borderless, and the right paper-size.
Recommended settings for Kodak 6850
Another photo printer that has been used is the Kodak 6850. This printer can handle a lot larger volume with its higher paper/ink capacity and speed.
The Kodak has been tested with the CUPS printing method, where the following settings work well with 4x6 paper size selected.
| Property | Value |
|---|---|
| Collage aspect ratio | 1.49 |
| Collage padding | 10 |
| Printer margin top | 0.0 |
| Printer margin right | 0.0 |
| Printer margin bottom | 1.5 |
| Printer margin left | 0.0 |
For small prints use, 1 column, 2 rows, and rotated images with 4x6 paper size.
For tiny prints, use 1 column, 2 rows, and rotated images with 2x6 paper size.
For split prints, use 2x6 paper size.
Templates
MomentoBooth works with a simple templating system to thematize your photos.
A collage output is constructed of 3 layers:
- Background template image
- Collage photos
- Foreground template image
Together with the shape and resolution modifying settings in templating settings the template-images define the look of your collage photos. It is recommended to get the template settings right before designing your template images. This avoids extra work to incorporate a different resolution, padding, or aspect ratio.
Tip
See the guide for desiging templates for a step-by-step tutorial on how to design your templates.
Template-file selection
The application will search for template files in the configured template directory. Different templates can be supplied for different collage layouts (1 photo, 2 photos, 3 photos, 4 photos, 0 no photos selected yet).
The template search & selection for a 3 photo collage, for example, works as follows:
- Is there a
back-template-3.png? - Is there a
back-template-3.jpg? - Is there a
back-template.png? - Is there a
back-template.jpg? - No background.
The same is repeated for the foreground with front-template.
A general background and foreground can thus be specified which are overriden by collage-specific back- and foregrounds.
Guide for designing templates
This guide will help you create and test templates for your event that features a MomentoBooth photobooth.
First, get the application to run as described in the getting started guide. If you haven’t done so, read the general concept behind the capture modes and collages.
Tip
You don’t need a webcam or webcam for developing templates, but it is fun to test your creations. If you don’t have one, you can select one of the debug options for the live view method.
Setting up your print layout
If the photobooth setup at your event will feature a printer, you must set up the correct printing layout to ensure your design will fit the paper. If not, skip to design your templates.
Use existing settings
If you are using an existing setup with known settings, you can import the settings preset file.
- Open the settings with the menubar or
Ctrl+Sand go to the templating tab. - Go to the import tab.
- Import the settings preset you need to use and hit accept.
If pre-exported template guide images are available, you can use those. If not, follow the guide below.
Create new settings
- Open the settings with the menubar or
Ctrl+Sand go to the templating tab. - Set the right aspect ratio and padding according to the printer that you will use (see e.g. recommended settings for printers). When not using a printer, you can leave these as-is. Set the output resolution multiplier to a sufficient value, e.g.
4. - Go to the output tab and set the output format to
png. - Get template guide image files
- Go back to the templating tab, scroll down to the template preview, and turn off the back- and foreground. You can choose if you want to include the middle ground with placeholder images.
- Hit
export. - You will find your guide images in the collage export folder you set-up in the getting started guide.
- Optionally, go to the output tab again and set the output format back to
jpg.
Design your templates
Using the guide images, you can design your templates using your favourite image editor.
The guide images have the following structure:
- The red border in the guide image is the padding for printing, this part will be cut-off, so don’t put important elements here. Note that it will still show up in the digital images.
- The white border shows the gap size to clearly distinguish the border regions. This part is printed.
To use your templates:
- Place your files in the templates subdirectory of your project folder. See the templates page on how to name your files.
- You can check the result using the template preview in the templates tab, by shooting a collage, or using the manual collage screen (see menubar, or use
Ctrl+M). If you made changes to your templates, go to a different settings tab and back to the templates tab to reload the images.
Checklist
To take
- Computer gear
- PC
- (Touch) screen and cables
- Power cables
- Camera gear
- Camera
- Tripod
- Battery dummy
- Battery dummy power adapter
- USB cable
- HDMI cable & capture device
- Printer gear
- Printer
- Paper
- Ink cardridges
- USB cable
- Lights
- Backdrop
Preparation
- Develop template materials
- Make sure to set the correct print related settings first so you have the correct dimensions.
- Check if the camera is functioning well
- Set camera settings correctly
- Check if the printers are functioning well
- Set printer settings correctly
- Set template settings correctly
- Check stability
Set-up
- Physical
- Connected all the cables
- Turn everything on
- Get internet connectivity
- Camera
- Check camera settings (ISO, shutter, aperature, single/multi-shot, capture format, …)
- Check lighting
- Software
- Latest version
- Check printer settings
- Check camera settings
- Check template settings
- Set directory settings correctly (input/output)
- Reset statistics
- Do a test run
Settings panel
Warning
The overview of the settings is not entirely up to date anymore. Most of the settings’ purpose and options will be clear from the application’s UI, however.
The settings panel can be opened using the menubar or by pressing Ctrl+S. When opened you will be greeted by a screen with a few tabs. These tabs are:
- Project
- Import
- General
- Hardware
- Output
- User interface
- Templating
- MQTT integration
- Face recognition
- Subsystem status
- Debug
- Log
Project settings
In the project settings tab, you can set options to themify MomentoBooth and customize some behaviours for your event. These settings are project-specific. As such, the settings are saved in your project directory, so the settings are also used when the project is opened on another computer.
Primary Color
This color is used for various UI elements in the app, such as buttons, input elements, and backgrounds.
Display Confetti 🎉
This setting controls the display of a confetti shower on the share screen within the photo booth application.
Colorize Confetti to Theme Color
If enabled, the colors of the confetti will will be various shades of the theme color (darker to lighter). Else, random colors will be used.
Alternative ‘Touch to Start’ Text
Text inserted in this setting field will override the text that will be shown on the Start screen instead of ‘Touch to start’. Leave empty to show the default text from the translations data.
Treat Single Photo as Collage
This setting determines how a single photo is processed within the photo booth application.
If enabled, a single picture will be treated as if it were a collage with 1 photo selected. This means that the photo will undergo collage processing, even though it contains only one photo.
If disabled, the single photo will be used unaltered.
Settings import
This settings panel contains a UI to import a settings fragment and apply the settings in the fragment over your existing settings. This can be handy to, for example, copy someone else’s printer layout settings. Before the settings are applied, a pop-up will appear to show you the settings that will be changed if the ‘overlay’ is applied. Changes are highlighted in bold.
A settings fragment can be supplied through dragging and dropping a .toml file, plain text, or browsing for a .toml file.
The same UI is also presented in the onboarding wizard.
General settings
In the general settings, you will find settings that influence the behaviour of the program.
Capture delay
This settings specifies the capture delay, a.k.a. countdown time, that is used when making photo captures.
Unit: Seconds
Load Last Project On Start
This setting determines whether the last opened project should be automaticlaly opened when the app starts.
When enabled, MomentoBooth will load the last opened project when it starts.
If disabled, a project must be opened manually each time.
Hotkeys
| Hotkey | Effect |
|---|---|
Ctrl+S | Toggle the settings screen. |
Ctrl+O | Browse for and open a project folder. |
Ctrl+F, Alt+Enter | Toggle fullscreen mode. |
Ctrl+M | Go to the manual collage creation screen. |
Ctrl+H | Return to the home screen. |
Hardware settings
In the hardware settings, you will find settings related to live view, photo capture and printing. Everything related to the hardware the program interfaces with.
General
Rotate Image
This setting determines whether the preview and capture images should be rotated. Rotation direction is clockwise, but is applied before the flip image`* setting.
Available Options:
- No rotation
- 90 degrees
- 180 degrees
- 270 degrees
Default: No rotation
Flip Image – Live View
This setting determines whether the preview image (not the final picture) should be flipped along none, one, or both axes within the photo booth application.
Available Options:
- None
- Horizontal
- Vertical
- Both
Default: Horizontal
Flip Image – Capture
This setting determines whether the captured images (not the final picture) should be flipped along none, one, or both axes within the photo booth application.
Available Options:
- None
- Horizontal
- Vertical
- Both
Default: Horizontal
Live View
Live View Method
This setting determines the method used for live previewing within the photo booth application.
Available Options:
- Debug – Static noise
- Webcam
- gPhoto2
Selected Option: [Option]
Please note that the selected option is based on the current configuration and can be changed by the user.
Webcam
This setting allows you to pick the webcam to use for live view when Webcam is selected for live view. It can also be used for capture by selecting Live view as capture method.
Photo Capture
Capture Method
This setting determines the method used for capturing the images within the photo booth application.
Available Options:
- Live view source
- Sony Imaging Edge Desktop automation
- gPhoto2
Capture Delay for Sony Camera
This setting specifies the capture delay for Sony cameras when using Sony Imaging Edge Desktop automation as the capture method. Please note that this setting is only visible when the Sony Imaging Edge Desktop automation is selected as the capture method.
Unit: Milliseconds (ms)
Description:
The capture delay is the time delay applied before the photo capture takes place. Sensible values for the capture delay are between 165 ms (for manual focus) and 500 ms.
Capture Delay for gPhoto2 Camera
This setting specifies the capture delay for cameras controlled using gPhoto2 as the capture method. Please note that this setting is only visible when the gPhoto2 is selected as the capture method.
Unit: Milliseconds (ms)
Description:
The capture delay is the time delay applied before the photo capture takes place.
Camera (gPhoto2)
This setting allows you to pick the camera to use for capturing within the photo booth application when gPhoto2 is selected for live view or capture method.
Description:
The “gPhoto2 Camera” setting provides a list of available cameras recognized by the gPhoto2 library. You can select the desired camera to use for capturing live view and still frames.
Use Special Handling for Camera
This setting determines the kind of special handling used for the camera when using gPhoto2 as the capture or live view method. This mostly relates to special vendor-specific operations, such as re-activating live-view for Nikon cameras.
Available Options:
- None
- Nikon DSLR
Capture Location
This setting specifies the location where the photo booth application will look for images captured by an external tool, such as Sony Imaging Edge Desktop.
Note that this is not the same as the location where the output files produced by MomentoBooth are stored. This is in the
Outputsubdirectory of the project folder.
Description:
The “Capture Location” is the folder path where the photo booth application will search for images captured using external tools. This allows the photo booth to access and display images taken separately, for instance, with Sony Imaging Edge Desktop.
Printing
Page Margins Used for Printing
This setting allows you to specify the page margins used for printing. This setting is used both for the native and CUPS printing methods.
Description:
The “Page Margins Used for Printing” setting compensates for printers that may cut off some part of the image during printing. You can adjust the margins to ensure that the entire image is captured on the printed page.
Unit: Millimeters (mm)
Order of Margins: Top, Right, Bottom, Left – CSS order
Queue Warning Threshold
This setting specifies the number of photos in the OS’s printer queue before a “Printer queue is long” warning is shown to the user to indicate it may take a while for the picture to appear. This feature is currently only supported on Windows systems.
Native printing
Printer
Like explained in the MomentoBooth capabilities, the application has multi-printer support. The Printer i setting with i 1, 2, ... allows selecting which printer(s) to use. Every selected printer will create another printer setting in the UI.
The options for a printer selection (in the form of a combo-box) are the printers currently configured on the OS. Icons show if the selected printer is currently connected and whether it is the system’s default printer or not.
It is possible to select the same printer multiple times. Prints are assigned round-robin.
Page Height
This setting specifies the page format height used for printing within the photo booth application.
Unit: Millimeters (mm)
Description:
The “Page Height” setting represents the height of the page format used for printing photos. Set it to your printers page height for the paper type you wish to use.
Page Width
This setting specifies the page format width used for printing within the photo booth application.
Unit: Millimeters (mm)
Description:
The “Page Width” setting represents the width of the page format used for printing photos. Set it to your printers page width for the paper type you wish to use.
Use Printer Settings for Printing
This setting controls the usePrinterSettings property of the Flutter printing library within the photo booth application. This setting is Windows only, and makes a difference on some but not all printers, experiment.
CUPS printing
Printer
Like explained in the MomentoBooth capabilities, the application has multi-printer support. The Printer i setting with i 1, 2, ... allows selecting which printer(s) to use. Every selected printer will create another printer setting in the UI.
The options for a printer selection (in the form of a combo-box) are the printers currently configured on the OS. Icons show if the selected printer is currently connected and whether it is the system’s default printer or not.
It is possible to select the same printer multiple times. Prints are assigned round-robin.
Page Size (normal, split, small, tiny)
This setting specifies the page size used for creating a print for the selected print size.
When a page size is configured for a given print size, a user can choose between normal print size, small print size, and tiny print size. The split page size is used when a normal print size is selected and the collage to be printed is a split-layout, i.e. 3-photo layout.
Options:
The options for this setting are populated by the available page sizes for the first selected printer in the CUPS section. The size name is given, followed by the corresponding dimensions in mm.
Print Grid
For small and tiny print sizes, a grid can be configured to print multiple copies of a photo on one page. The options are as follows.
- X – The number of columns
- Y – The number of rows
- Rotate – Whether to rotate the images (place them landscape instead of portrait)
Output settings
In the output settings, you can customize the output file generation and sharing of the results.
Local
Output files will be saved to the Output subdirectory of your project folder.
Share using internet
Firefox Send URL
This setting specifies the Firefox Send server URL used to generate a QR code for easy image downloads to your phone using the Firefox Send service.
Image settings
Image File Type
This setting determines the type of image file to generate for image export within the photo booth application.
Available Options:
- JPG
- PNG
Default: JPG
JPG Quality
This setting specifies the export quality for JPG images within the photo booth application. Higher quality values result in larger file sizes, while lower values lead to smaller files with potentially reduced image quality.
Value Range:
Minimum: 1
Maximum: 100
Output Resolution Multiplier
This setting controls the image resolution multiplier within the photo booth application, which in turn controls the image resolution of the exported photos. A factor of 1.0 results in a resolution of 1000 pixels on the long side of the image and 1000/aspect ratio on the short side without padding.
The calculation of the total image height is as follows:resolutionMultiplier * (1000 + collagePaddingSetting * 2)
And the width:resolutionMultiplier * (1000/collageAspectRatioSetting + collagePaddingSetting * 2)
User interface settings
In the user interface settings, you will find settings related to live view, photo capture and printing. Everything related to the hardware the program interfaces with.
Language
This setting allows you to choose the language used for the app’s user interface (except for the settings screen).
Available Options:
- English
- Dutch
- German
Return to Home Timeout
The time in seconds before the app returns to the home screen. Set to 0 to disable.
Unit: Seconds
Default: 45
Animations
Screen Transition Animation
This setting determines the screen transition effect that occurs when navigating between different screens.
Available Options:
- None
- Fade and Scale (default)
- Fade and Slide
Advanced
Background Blur
Sets the background blur implementation. Currently there are no options for this setting except disabling it for testing.
Available Options:
- None
- Use texture blur (default)
Filter Quality for Screen Transitions
This setting controls the filter quality used during the screen transition scale animation.
Available Options:
- None
- Low (default)
- Medium
- High
Filter Quality for Live View
This setting controls the filter quality used for displaying the live view.
Available Options:
- None
- Low
- Medium (default)
- High
Templating settings
In the templating settings, you will find the settings related to the generation of collage images such as template images, shape and padding, resolution. This settings tab conveniently also features a template preview section.
Creative settings
Collage Aspect Ratio
This setting controls the aspect ratio of the generated collage images. Consider this aspect ratio in conjunction with the desired paper print size for optimal results. Typical values are 1.5 for 3/2 photos or the aspect ratio of your paper.
Collage Padding
This setting controls the padding around the aspect ratio of the generated collages images. Consider this padding in conjunction with the desired paper print size for optimal results.
Output Resolution Multiplier
This setting controls the image resolution multiplier within the photo booth application, which in turn controls the image resolution of the exported photos. A factor of 1.0 results in a resolution of 1000 pixels on the long side of the image and 1000/aspect ratio on the short side without padding.
The calculation of the total image height is as follows:resolutionMultiplier * (1000 + collagePaddingSetting * 2)
And the width:resolutionMultiplier * (1000/collageAspectRatioSetting + collagePaddingSetting * 2)
The above setting is repeated from output settings.
Template preview
The template preview section allows you to quickly check if your designed template images give the desired results. A placeholder image is inserted for every field that will contain user captures during operation.
Using the buttons you can select which collage type you want to see (no selection, 1, 2, 3, 4 photos) and export the result for further inspection. The background and foreground layers of the collage can be toggled on and off to see the individual effect of those layers, or for generating a clean and transparent reference to design around (see note below).
Please note that exporting generates the file type specified in the output settings. Select
pngfor file type if you want lossless images or transparency.
The red border shown in the preview is the printing padding added “collage padding” setting. If set correctly this will not be visible/cut-off on the print. The white border is the standard gap present for the collage grid. The section also shows the template files that are selected for the selected collage after searching the template directory.
To refresh the templates, switch to another settings tab and back.
MQTT integration settings
This settings panel allows setting up the MQTT integration feature.
If the integration is enabled, the application will publish MQTT messages to the specified broker and will subscribe for commands.
Connection
This section contains all settings related to the connection with and authentication for your MQTT broker. Set these up according to your broker settings.
Client
These settings specify the publication topic and client ID.
Home Assitant integration
Integration with Home Assistant is available, so automations can be created that respond to the state of the app in real time. Settings are available for the discovery topic (usually homeassistant), and the device ID.
Face recognition settings
This experimental feature uses the Python Image Analyzer to analyze the captured images/collage to allow easier sorting in the gallery by number of people in the picture and search for a picture by matching a face.
Subsystem status
This settings tab contains an overview to quickly check for and solve any issues that may arise in the functionality of the app. For this purpose, the status of each subsystem is shown, which can either be busy, ok, disabled, warning, error, or deferred. When a problem arises, the subsystem may present actions/fixes in through buttons to resolve the situation.
Statistics & Debug settings
In the statistics and debug settings panel, you will find fun statistics about app usage and some debug-related settings.
Statistics
The app keeps track of the following statistics:
-
Taps The number of taps in the app (outside settings).
-
Live view frames The number of live view frames processed from the start of the camera. Value shows: Valid frames / Undecodable frames.
-
Printed pictures The number of prints (e.g. 2 prints of the same pictures will count as 2 as well).
-
Uploaded pictures The number of uploaded pictures.
-
Captured photos The number of photo captures (e.g. a multi-capture picture would increase this by 4).
-
Created single shot pictures The number of single-capture pictures created.
-
Retakes The number of retakes for (single) photo captures.
-
Created multi shot pictures The number of multi-shot pictures created.
Debug
Report Fake Error
This button allows you to test the error reporting functionality. When you click the “Report Fake Error” button, the application will intentionally throw an exception, generating a fake error that will be reported to Sentry.
Log panel
The log panel simply displays the log that is also printed in the debug console to enable viewing the log in the field. The log shows the log level, time, message, and component.
Setup
Stack
- Languages: Dart, Rust, C++ (Windows, Linux), Swift (macOS)
- Dart <-> Rust glue: flutter_rust_bridge
- UI: Flutter
- Webcam: Nokhwa
- Printing: Printing
- Logging: Talker
- Data classes: Freezed
- Firefox Send client: ffsend-api
- JPEG decoding: zune-jpeg, encoding: jpeg-encoder
Requirements
For all languages, frameworks and tools, we support the latest versions.
For all platforms
-
flutter_rust_bridge_codegen-
Install using Cargo:
cargo install flutter_rust_bridge_codegen --version 2.11.1
-
-
Flutter SDK 3.41.0+
- Be sure that the
fluttercommand is available globally asflutter_rust_bridge_codegenneeds it.
This is especially important when using Flutter SDK managers likeasdforfvm
- Be sure that the
-
Optional: For building the documentation mdBook and some extensions for mdBook are needed
-
Install using Cargo:
cargo install mdbook mdbook-mermaid
-
-
Be sure to read the docs for troubleshooting and workarounds
On Windows
- Visual Studio 2026 Build Tools
- Optional: full Visual Studio 2026 installation
- Select Desktop development with C++ under the Workloads tab
- Under installation details on the right panel, select the MSVC Build Tools, Windows 11 SDK, and C++ ATL (needed for Flutter secure storage plugin)
- Rust
- Recommended installation via
rustupto keep components up to date - Use default options (MSVC host, target, and toolchain)
- Recommended installation via
- MSYS2
-
Follow the instructions on the MSYS2 website
-
Install the following packages:
mingw-w64-clang-x86_64-pkgconf mingw-w64-clang-x86_64-libgphoto2 mingw-w64-clang-x86_64-curl-winssl mingw-w64-clang-x86_64-nghttp2 mingw-w64-clang-x86_64-nghttp3 -
Make sure
{MSYS_INSTALL_PATH}\clang64\binis in yourPATH(before other folders that also providepkg-config/pkgconf)
-
On macOS
- Xcode
- Installing from the App Store is recommended (automatic updates)
- Rust (
aarch64-apple-darwinorx86_64-apple-darwin, depending on your architecture) - Homebrew
-
Install with
pkgconf libgphoto2
-
On Linux
-
System packages
- See the Flutter documentation for a list of required packages
- Note: the installation command provided by Flutter may only work on Ubuntu — check your distro’s package names
-
Additional packages
llvm libssl-dev libdigest-sha-perl libcurl4-openssl-dev libasound2-dev -
Rust (
x86_64-unknown-linux-gnuoraarch64-unknown-linux-gnu, depending on your architecture)- Recommended installation via
rustup
- Recommended installation via
Build steps
Using just (recommended)
Please note: This method expects global fvm to be available and just.
- Run
justfrom the root folder of the repository - Run
flutter runor use your IDE to run the application
Manually
Please note: Run all commands from the root folder of the repository, unless mentioned otherwise.
-
Generate translation files.
flutter gen-l10n -
Generate Rust <-> Dart code
flutter_rust_bridge_codegen generate- Note: Make sure to re-run this command if you changed anything in the Rust subproject.
-
Generate Dart helper code
dart run build_runner build -
Build and run the app with
flutter runor use your IDE to run the application- Note: This will automatically build the Rust subproject before building the Flutter project, so no need to worry about that!
Developing tips
When to re-run build steps
- If you have changed any code in the Dart or Rust project that could change the generated bridging code, you should re-run the
flutter_rust_bridge_codegen generateorjust gen-bridgecommand- You can also run
flutter_rust_bridge_codegen generate --watchorjust watch-bridgeto automatically regenerate the bridging code when you save a file - You might need to run
dart run build_runner build --delete-conflicting-outputsorjust gen-code
- You can also run
- If you have changed any code related to JSON or TOML serialization, or MobX, you should re-run the
dart run build_runner build --delete-conflicting-outputsorjust gen-codecommand- You can also run
dart run build_runner watch --delete-conflicting-outputsorjust watch-codeto automatically regenerate the code when you save a file
- You can also run
- If you have changed any code related to the localization, you should re-run the
flutter gen-l10nofjust gen-l10ncommand
Adding a new screen using the VS Code extension Template
- Make sure to have the Template extension installed
- Right click the
viewsfolder in VS Code Explorer - Click Template: Create New (with rename), pick the
viewtemplate - Pick a name, enter it in
{snake_case}_screenformat (e.g.settings_screenoremail_photo_screen), press Enter - Your new view should be available!
Command Line Arguments
The application features a very basic Command Line Interface. Right now, the following options are supported.
| Option | Abbreviation | Help |
|---|---|---|
--fullscreen | -f | Run in fullscreen mode (default: false) |
--open | -o | Open given directory as a project |